Mastering Smoked Spatchcock Chicken: A Step-by-Step Guide
There are few culinary experiences as satisfying as biting into perfectly cooked, juicy chicken with a smoky aroma and crispy skin. While smoking a whole chicken can sometimes lead to uneven cooking and rubbery skin, there's a game-changing technique that elevates your poultry game: smoked spatchcock chicken. This method, often overlooked by beginners, ensures every part of the bird cooks evenly, faster, and results in an incredibly tender interior with that coveted crisp exterior.
If you've ever struggled with dry breast meat or undercooked thighs when smoking a whole bird, spatchcocking is your answer. Also known as butterflying, this technique involves removing the backbone and flattening the chicken, allowing for consistent heat distribution. This guide will walk you through every step, from preparing your chicken to achieving that flawless finish, ensuring your next smoked spatchcock chicken is nothing short of spectacular.
Why Spatchcocking is a Game-Changer for Smoked Chicken
Before diving into the how-to, let's understand why spatchcocking is superior for smoking. The traditional whole chicken often suffers from its uneven shape in the smoker. The thickest parts (breasts and thighs) are at different distances from the heat source, and the cavity acts as an insulator, slowing down internal cooking. This often leads to overcooked breasts by the time the thighs are done, or vice-versa.
When you spatchcock a chicken, you essentially create a flat canvas. Here's why this transformation is so beneficial:
- Even Cooking: By flattening the chicken, all parts of the bird are exposed to the heat more uniformly. This means the breast meat and thigh meat reach their ideal doneness at roughly the same time, preventing dry breasts or undercooked thighs.
- Faster Cooking: With increased surface area exposure to heat and smoke, a spatchcocked chicken cooks significantly faster than a whole bird. This reduces overall smoking time, getting delicious food on the table quicker.
- Crispier Skin: The flattened profile allows air to circulate more freely around the skin, especially on the underside, which aids in rendering fat and achieving a wonderfully crispy skin all over.
- Better Smoke Penetration: More exposed surface area means more real estate for that beautiful smoky flavor to infuse into the meat.
For a deeper dive into the advantages of this method, check out our comprehensive comparison: Spatchcock vs. Whole: The Best Smoked Chicken Method.
Essential Tools and Ingredients for Your Smoked Spatchcock Chicken
To embark on your journey to perfect smoked spatchcock chicken, you'll need a few key tools and quality ingredients. Having everything ready before you start will make the process smooth and enjoyable.
The Right Tools
- Smoker: Whether it's a pellet smoker, charcoal grill with a smoke box, or an offset smoker, ensure it's clean and ready to go.
- Sharp Kitchen Shears: Absolutely essential for spatchcocking. Don't try this with a regular knife; good shears make it quick and easy.
- Cutting Board: A large, sturdy one for handling the chicken.
- Meat Thermometer: A reliable leave-in probe thermometer and an instant-read thermometer are crucial for monitoring internal temperature and ensuring food safety.
- Large Baking Sheet or Pan: To hold the chicken during prep and for resting.
- Tongs or Heat-Resistant Gloves: For safely handling the hot chicken.
Ingredients You'll Need
- Whole Chicken (3-5 lbs): Look for a fresh, good-quality bird. A smaller chicken is often easier to spatchcock and cooks more evenly.
- Olive Oil or Mustard: Acts as a binder for your rub and helps the skin crisp up.
- Your Favorite Rub/Seasoning: A good poultry rub with salt, pepper, garlic powder, onion powder, paprika, and a touch of brown sugar works wonders. Feel free to experiment!
- Wood Chunks or Pellets: The type of wood profoundly impacts the flavor.
- Fruit Woods (Apple, Cherry, Peach): Milder, slightly sweet, excellent for poultry.
- Oak: Medium, versatile smoke that pairs well with almost anything.
- Hickory: Stronger, classic BBQ flavor. Use sparingly if you prefer a milder smoke.
- Optional Brine Ingredients: If you plan to brine (highly recommended for extra juiciness), you'll need salt, sugar, and any aromatics you like (bay leaves, peppercorns, herbs).
The Step-by-Step Guide to Perfect Smoked Spatchcock Chicken
Now, let's get down to business. Follow these steps meticulously, and you'll be rewarded with the best smoked spatchcock chicken you've ever tasted.
Step 1: Spatchcocking Your Chicken
- Prepare Your Workspace: Place your chicken breast-side down on a large, clean cutting board.
- Locate the Backbone: Identify the backbone running down the center.
- Cut Along the Backbone: Using sharp kitchen shears, cut along one side of the backbone, from the tail end up to the neck. Apply firm, steady pressure.
- Repeat on the Other Side: Cut along the other side of the backbone. Once both cuts are made, remove the backbone. You can discard it or save it for stock.
- Flatten the Chicken: Flip the chicken over so it's breast-side up. Press down firmly on the breastbone with the heels of both hands until you hear a crack. This flattens the bird completely.
Step 2: Preparing the Chicken for Smoking
- Pat Dry: Use paper towels to thoroughly pat the chicken dry, inside and out. This is crucial for crispy skin.
- Apply Binder: Lightly coat the entire chicken with a thin layer of olive oil or yellow mustard. This helps the rub adhere and contributes to a beautiful crust.
- Season Generously: Apply your chosen rub evenly over the entire chicken, ensuring good coverage on both sides, and under the skin of the breasts and thighs if desired. Don't be shy with the seasoning.
- Refrigerate (Optional but Recommended): For best results, place the seasoned chicken on a wire rack over a baking sheet and refrigerate for at least 4 hours, or preferably overnight. This allows the rub to penetrate and further dries out the skin, promoting crispiness.
Step 3: Setting Up Your Smoker
- Preheat Your Smoker: Set your smoker to a target temperature of 250°F (120°C). This low-and-slow approach allows for maximum smoke penetration and tender meat.
- Add Wood: Place your chosen wood chunks or pellets into the smoker according to your manufacturer's instructions. You want a consistent, thin blue smoke. Avoid thick, white smoke, which can impart a bitter flavor.
- Consider a Water Pan: If your smoker has space, a water pan helps maintain moisture in the cooking chamber, preventing the chicken from drying out.
Step 4: The Smoking Process
- Place the Chicken: Once the smoker is at temperature and producing good smoke, carefully place the spatchcocked chicken directly on the grates, breast-side up.
- Insert Probe Thermometer: Insert a leave-in probe thermometer into the thickest part of the breast, ensuring it doesn't touch bone. This is vital for accurate temperature monitoring.
- Smoke Low and Slow: Maintain the smoker temperature at 250°F (120°C). The initial smoking phase will take approximately 2-3 hours, depending on the size of your chicken and smoker stability.
- Monitor Internal Temperature: Smoke until the internal temperature in the breast reaches about 150-155°F (65-68°C) and the thighs are around 165°F (74°C).
Step 5: Achieving Crispy Skin and Resting
- Crank Up the Heat: Once the internal temperature targets are met, increase your smoker's temperature to 375-400°F (190-205°C). This higher heat will render the remaining fat in the skin, making it delightfully crispy. If your smoker can't reach this high, you can transfer the chicken to a preheated oven or hot grill for this step.
- Finish Cooking: Continue cooking at the higher temperature until the internal temperature in the thickest part of the breast reaches 160-165°F (71-74°C) and the thighs reach 175°F (79°C). The higher temperature for thighs breaks down connective tissue, making them incredibly tender. The skin should be golden brown and crispy.
- Rest the Chicken: This is arguably one of the most important steps. Remove the smoked spatchcock chicken from the smoker and place it on a clean cutting board or baking sheet, tented loosely with foil. Let it rest for at least 15-20 minutes. This allows the juices to redistribute throughout the meat, resulting in a much juicier bird.
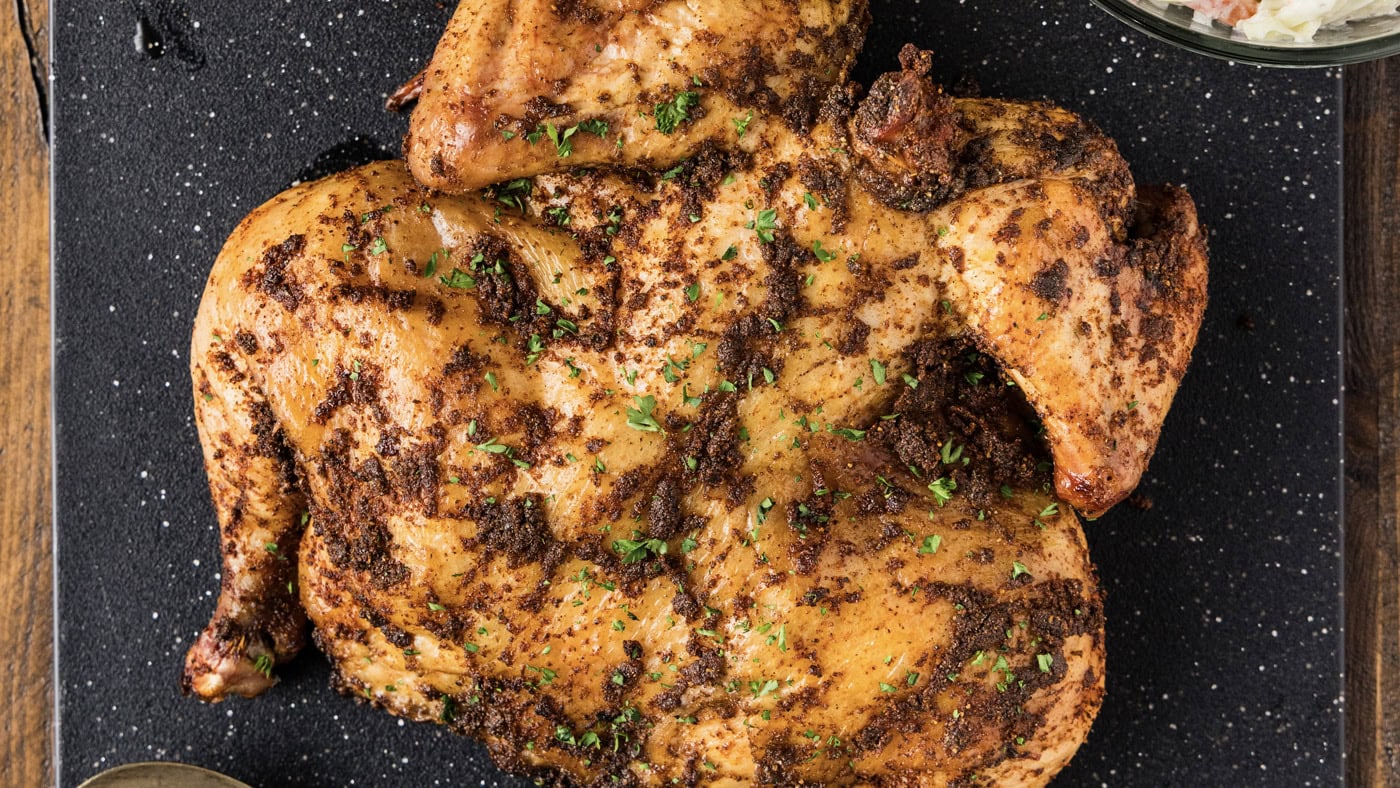
- Carve and Serve: After resting, carve your perfectly smoked chicken and enjoy!
Pro Tips for Max Flavor and Success
To truly master your smoked spatchcock chicken, consider these expert tips that can take your results from great to extraordinary:
- Brine for Juiciness: For an exceptionally juicy chicken, consider a pre-smoke brine. A simple solution of water, salt, sugar, and your preferred aromatics (bay leaves, peppercorns, garlic) for 4-6 hours can make a huge difference in moisture retention.
- Don't Over-Smoke: While we want that smoky flavor, too much smoke can make the chicken bitter. Aim for 2-3 hours of consistent smoke at the beginning, then let the ambient heat finish the cooking.
- Monitor Smoker Temperature: Keep a close eye on your smoker's temperature. Fluctuations can lead to uneven cooking. An external thermometer probe for your smoker's chamber is highly recommended.
- Spritzing: Some pitmasters like to spritz the chicken every 45-60 minutes with apple cider vinegar, apple juice, or even a mix of chicken broth and butter. This can help keep the surface moist and promote a nice bark, but it's optional and can slightly slow cooking.
- Know Your Wood: Experiment with different types of wood to find your favorite flavor profile. Apple and cherry are fantastic for poultry, imparting a mild, sweet smoke.
- Fat Rendering: If your chicken skin isn't crisping up at the end, ensure your smoker or oven temperature is high enough (375-400°F) to truly render out the fat.
For even more in-depth techniques and flavor hacks, be sure to read our dedicated article: Smoked Spatchcock Chicken: Pro Tips for Max Flavor.
Mastering smoked spatchcock chicken is a rewarding endeavor that will elevate your backyard BBQ game. By following these detailed steps, understanding the importance of the spatchcocking technique, and paying attention to internal temperatures, you'll consistently achieve a chicken that is wonderfully tender, incredibly juicy, packed with smoky flavor, and boasts irresistibly crispy skin. Don't be intimidated; grab your shears, fire up your smoker, and prepare to impress yourself and your guests with this fantastic poultry masterpiece.
